Mongoose란?
- Mongoose 라이브러리는 MongoDB란 NoSQL DB를 Node.js에서 사용할 수 있게 도와주는 라이브러리이다.
- 데이터를 만들고 관리하기 위해 스키마(Schema)를 만들고, 그 스키마로 모델(Model)을 만들어 데이터를 관리한다.
- 스키마와 모델로 데이터를 불러온 후 객체화시켜서 빠르게 수정함으로써 데이터에 접근 가능하게 만들어준다.
MongoDB 데이터 베이스 생성
우선 MongoDB를 사용하기 위해 웹 사이트에 접속해서 간단한 회원가입을 진행한다.
MongoDB: 애플리케이션 데이터 플랫폼
업계 최고의 최신 데이터베이스를 토대로 구축된 애플리케이션 데이터 플랫폼을 사용해 아이디어를 더욱 빠르게 실현하세요. MongoDB는 데이터를 손쉽게 처리할 수 있도록 지원합니다.
www.mongodb.com
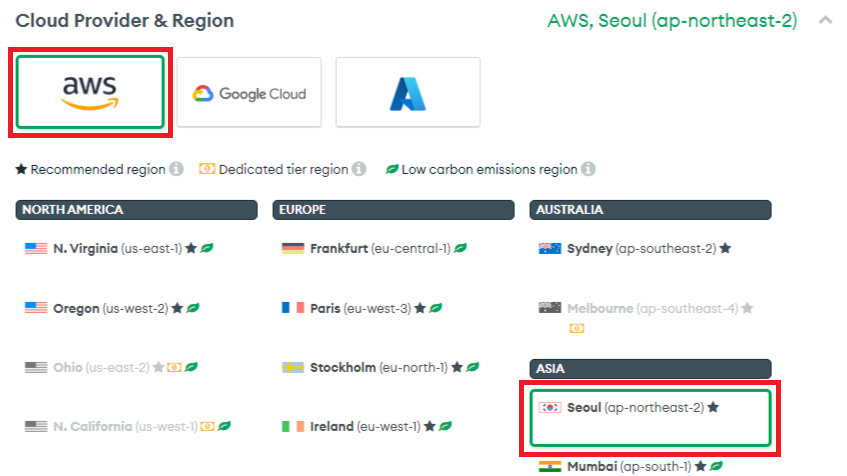
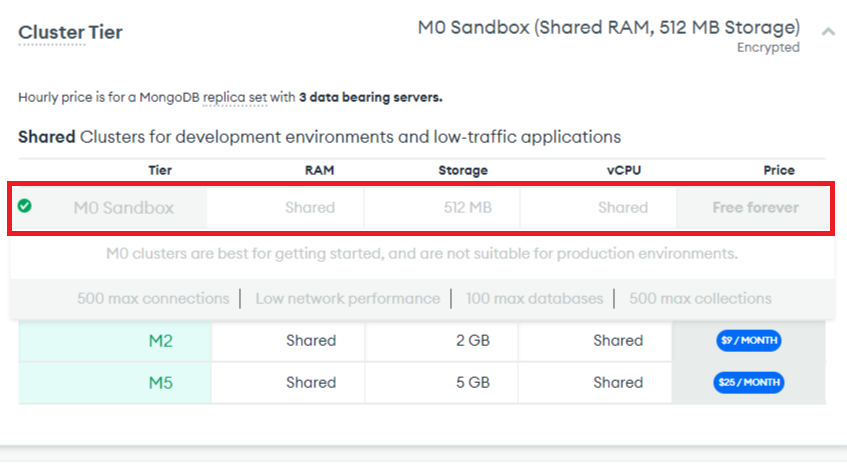
회원가입 완료 후 이메일 인증을 완료하고 Cluster를 생성해준다.
Provider는 AWS, 지역은 서울로 선택하고, 요금제는 M0(무료) 요금제로 선택해주면 새로운 Cluster가 생성된다.
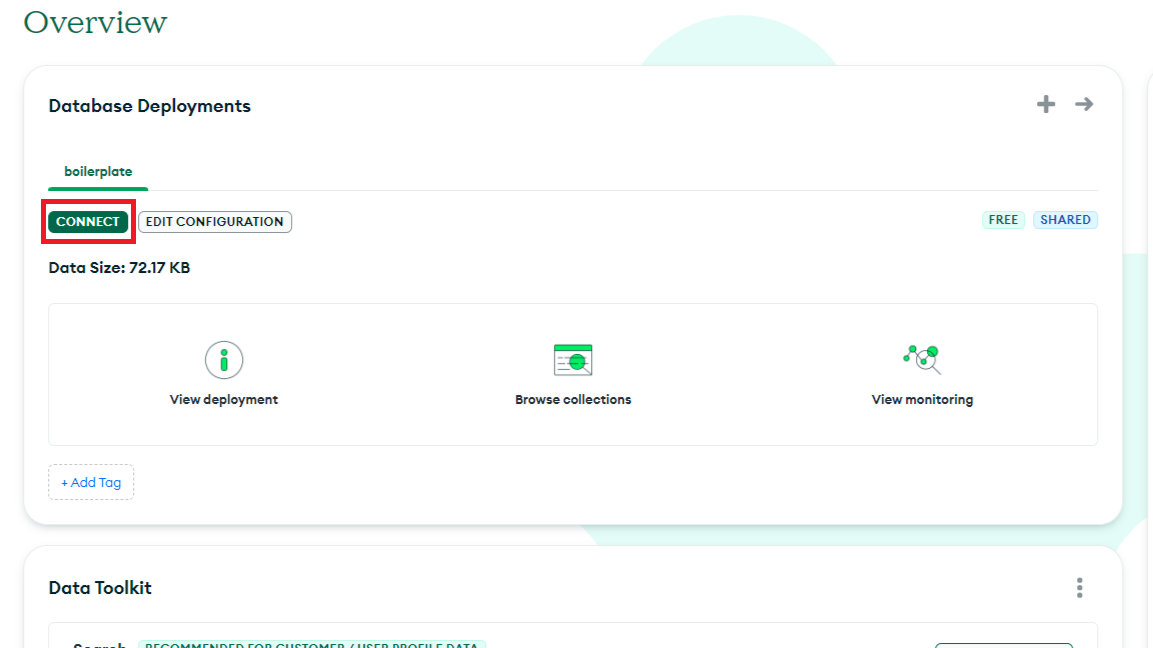
Overview 페이지에 접속하면 다음과 같이 데이터 베이스 목록을 보여준다.
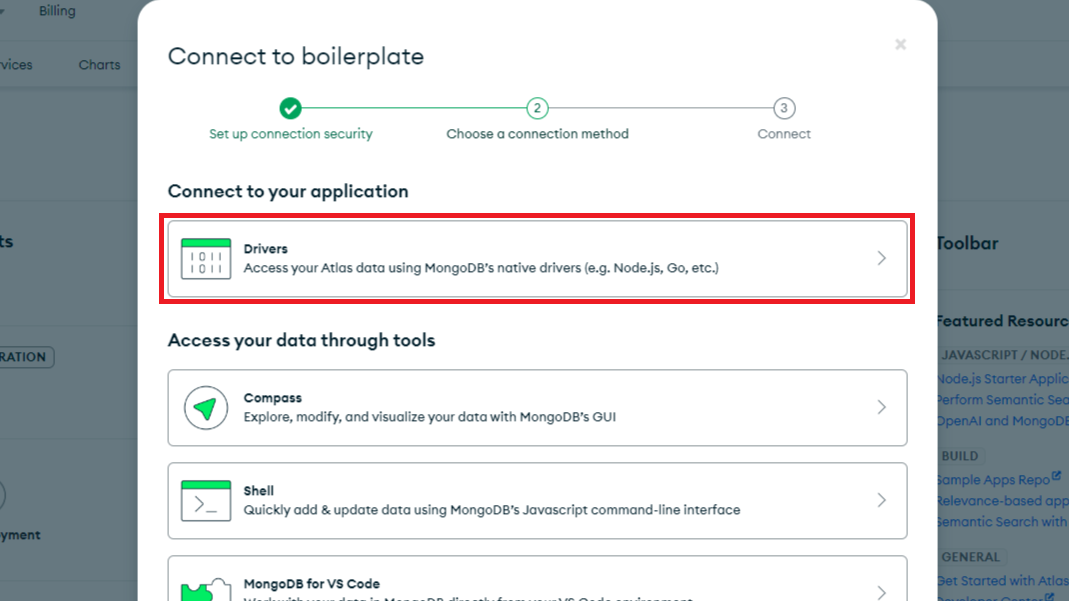
방금 생성한 DB의 CONNECT 버튼을 눌러준다.
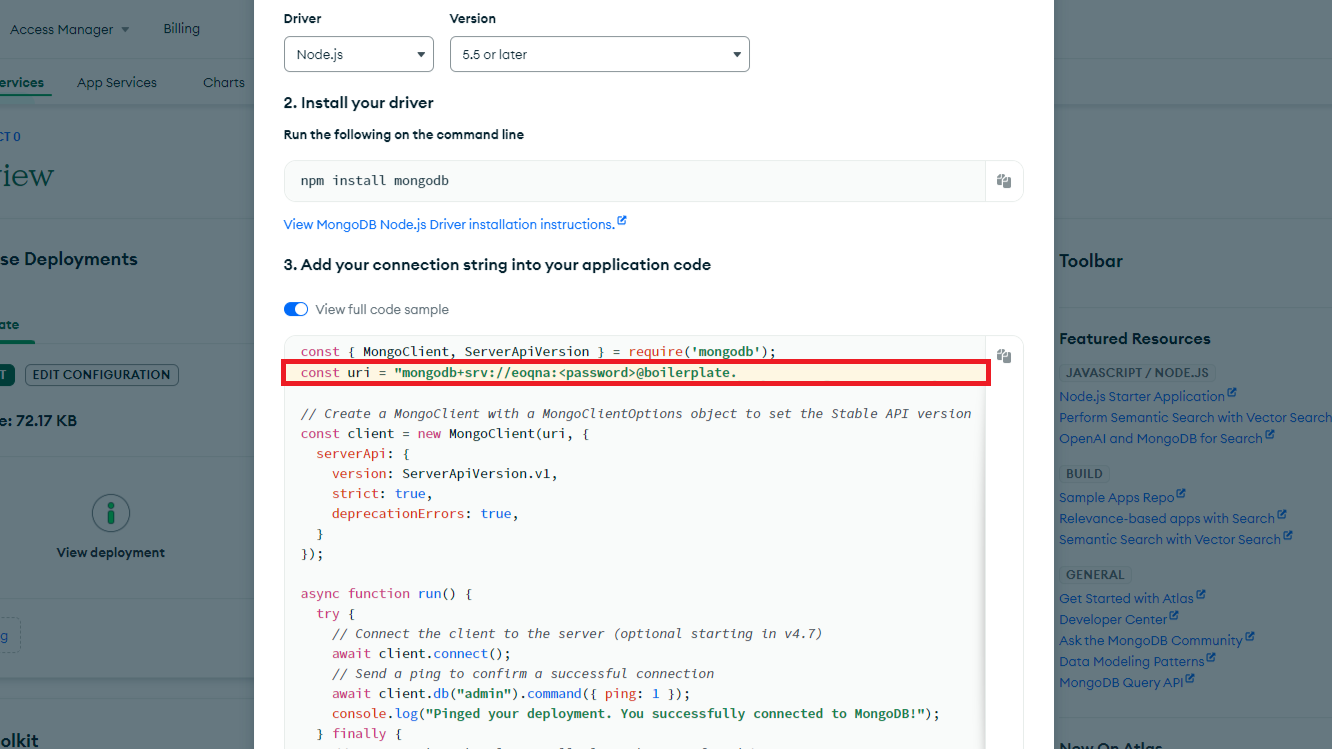
그리고 Drivers에 들어가서 node.js를 선택하면 보여지는 const uri 값을 전체 복사해서 따로 저장해준다.
uri는 나중에 node.js에서 MongoDB와 connect할 때 사용한다.
mongoose 라이브러리 설치 및 연동
이전에 생성한 프로젝트에 mongoose 라이브러리를 설치해준다.
npm install mongoose
index.js 파일에 코드를 작성해준다.
// index.js
import express from "express";
import mongoose from "mongoose";

const app = express();
const port = 5000;

mongoose.connect(uri, {
  autoIndex: true,
})
.then(() => {
  console.log("MongoDB Connected!");
})
.catch((err) => {
  console.log(err);
});

app.get("/", (req, res) => res.send("Hello, World!"));

app.listen(port, () => console.log(`Example app listening on port ${port}!`));
uri 부분에는 방금 전에 MongoDB의 Connect에서 저장한 uri를 붙여넣어주면 된다.
<password> 부분에 DB를 생성하면서 설정한 password를 입력해주면 된다.
ex.
  mongodb+srv://eoqna:test1@boilerplate...
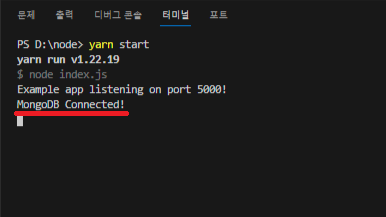
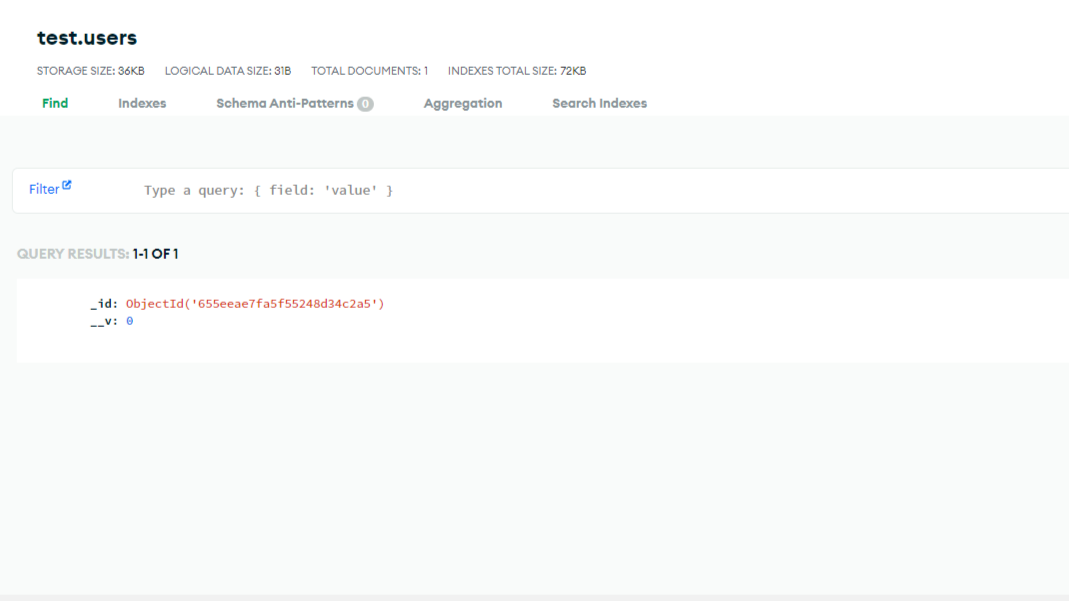
MongoDB와 연결 성공 시 다음과 같은 로그가 출력된다.
URI 관리
실제 배포된 프로그램을 Git에 public으로 게시하는 상황은 거의 없겠지만 만약의 경우에 대비해 두는 것이 좋다.
그래서 URI같은 프라이빗한 정보들은 따로 config 파일을 만들어서 관리해주는 것이 좋다.
실제 배포된 프로그램과 연동된 DB일 경우 민감 정보를 포함하고 있기 때문에 DB의 주소가 노출되는 일은 없어야한다.
루트 프로젝트 아래에 config 폴더를 생성하고 config.js 파일을 생성한 후 코드를 작성해준다.
// config.js
export const MongoURI = "mongodb+srv://eoqna:password ...";


// index.js
import { MongoURI } from "./config/config.js";

...
그리고 Git에 파일이 게시되지 않도록 루트 폴더에 .gitignore 파일을 생성해주고 코드를 작성해준다.
// .gitignore
node_modules
dev.js
Schema, Model 생성
루트 프로젝트에 models 폴더를 생성하고 User.js 파일을 생성한 후 다음과 같이 코드를 작성해준다.
// User.js
import mongoose from "mongoose";

const userSchema = mongoose.Schema({
  email: {
    type: String,
    trim: true,
    unique: true,
  },
  password: {
    type: String,
    max: 20,
  },
  name: {
    type: String,
    max: 20,
  },
  role: {
    type: Number,
    default: 0,
  },
  token: {
    type: String,
  },
  tokenExp: {
    type: Number,
  }
});

const User = mongoose.model("User", userSchema);

export default User;
- type - key와 연결된 value에 들어갈 수 있는 type을 지정해준다.
- trim - 입력값에 띄어쓰기가 들어갈 경우 trim 함수를 통해 띄어쓰기를 삭제한다.
- unique - true나 1값을 넣어줄 경우 해당 key에 존재하는 value인 경우 insert하지 않는다.
- max - value의 글자수에 제한을 둔다.
- default - 미입력 시 기본으로 들어가는 값을 명시할 수 있다.
- index - value에 index를 하나 더 부여해서 조건을 줄 경우 성능을 향상시킨다.
- required - 해당 key와 value가 존재하지 않을 경우 insert하지 않는다.
이 외에도 여러 가지 요소들을 포함할 수 있다.
생성한 Model을 이용해 간단한 회원가입 기능을 만들어보겠다.
MongDB 데이터 저장
index.js에 간단한 회원가입 기능 코드를 작성해준다.
// index.js
import express from "express";
import mongoose from "mongoose";
import { MongoURI } from "./config/config.js";
import User from "./models/User.js";

const app = express();
const port = 5000;

mongoose.connect(MongoURI, {
  autoIndex: true,
})
.then(() => {
  console.log("MongoDB Connected!");
})
.catch((err) => {
  console.log(err);
});

// 메인 페이지 접속
app.get("/", (req, res) => res.send("Hello, World!"));

// 회원가입 URI 접속
app.post("/api/users/register", (req, res) => {
  console.log("/api/users/register");

  // 회원 가입 시 필요한 정보들을 client에서 가져오면 해당 정보를 DB에 저장한다.
  const user = new User(req.body);

  console.log(req.body);

  // 이전 코드 (mongoose 6.0 version 이하)
  // user.save((err, userInfo) => {
  //   if( err ) {
  //     return res.json({ success: false, err });
  //   }

  //   return res.status(200).json({
  //     success: true,
  //   });
  // });

  // mongoose 6.0 버전 이상
  // mongoose 라이브러리가 더 이상 콜백을 허용하지 않는다.
  // https://stackoverflow.com/questions/75586474/mongoose-stopped-accepting-callbacks-for-some-of-its-functions
  user.save()
    .then(() => {
      res.status(200).json({
        success: true
      });
    })
    .catch((err) => {
      res.json({ success:  false });
    });
});

app.listen(port, () => console.log(`Example app listening on port ${port}!`));
강의를 들으면서 user.save() 함수 안에 직접 callback함수를 넣어줬다.
하지만 해당 코드에서 에러가 발생했고 서버가 shutdown됐다.
이유는 mongoose 6.0 버전 이상부터 save 함수에서는 더이상 callback함수를 지원하지 않는다고 한다.
Mongoose stopped accepting callbacks for some of its functions
I've been using callbacks for .save() and .findOne() for a few days now and just today I encounter these errors: throw new MongooseError('Model.prototype.save() no longer accepts a callback')
stackoverflow.com
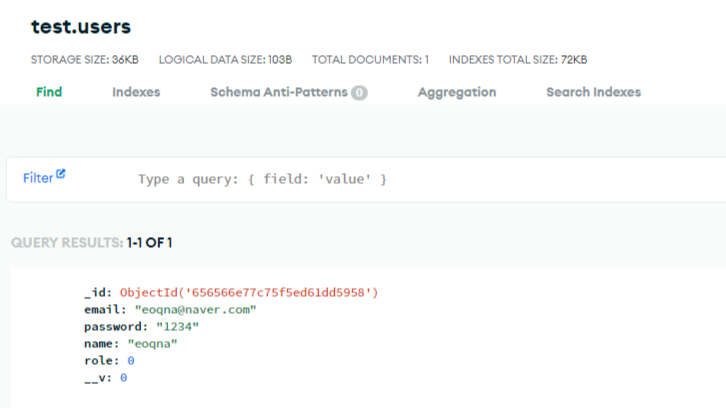
코드를 변경한 후 postman을 이용해서 서버로 데이터를 전송하고 success: true 값을 return 받았다.
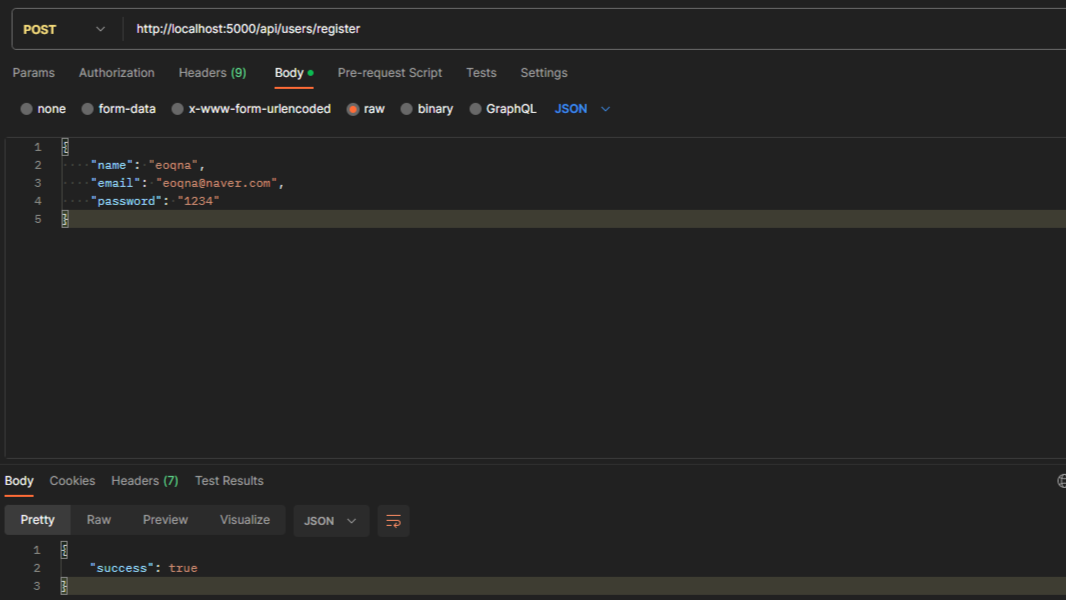
코드가 정상적으로 동작됐지만 MongoDB의 데이터를 확인해보니 데이터가 제대로 insert되지 않았다.
body 데이터 json 파싱
원인은 postman에서 데이터를 json 형식으로 보냈는데
서버에서 데이터를 json으로 parsing하지 못해서 데이터를 제대로 insert하지 못했다.
express에서는 body데이터를 json 데이터로 파싱할 수 없기 때문에 다른 라이브러리를 설치하여 파싱한다.
body-parser 설치 및 적용
body-parser 라이브러리를 설치해준다.
npm install body-parser
설치가 완료됐으면 index.js 파일안에 body-parser를 import하고 express에 설정해준다.
import express from "express";
import mongoose from "mongoose";
import bodyParser from "body-parser";
import { MongoURI } from "./config/config.js";
import User from "./models/User.js";

const app = express();
const port = 5000;

// application/x-www-form/urlencoded
app.use(bodyParser.urlencoded({extended: true}));

// application/json
app.use(bodyParser.json());

...

app.listen(port, () => console.log(`Example app listening on port ${port}!`));
body-parser의 urlencoded 설정에 대해서는 아래의 블로그를 참고하자.
body-parser의 urlencoded는 도대체 어떤 역할을 하는 걸까?
node express를 사용할 때, 뭐랄가 기본 세트처럼 딸려오는 모듈들 중에서,데이터(client에서 post로 보내준 데이터)들을 자동으로 파싱해주어서, 진짜로 필요한 부분인 body부분을 쉽게 추출해주는 body
velog.io
서버를 재실행한 후 postman으로 아까와 같이 데이터를 전송하면 MongoDB에 insert된 것을 확인할 수 있다.
'🖥️Frontend > Node' 카테고리의 다른 글
| [Node] 페이지 접속 시 JWT 토큰 인증 (0) | 2023.11.30 |
|---|---|
| [Node] 회원 로그인, 비밀번호 복호화 및 JWT 토큰 생성 (0) | 2023.11.29 |
| [Node] 회원 가입, 비밀번호 암호화 (2) | 2023.11.28 |
| [Node] nodemon 설치 (자동 코드 반영) (1) | 2023.11.28 |
| [Node] node.js & express로 간단한 서버 구현 (1) | 2023.11.23 |

댓글